How to build a blog in less than 100 lines of code
I’ve been thinking about writing a blog for quite some time. There are a couple of reasons that were motivating me to get started: One point was that I thought I should write down and comment on some of the code that I write, so I could get back to it at a later stage more easily, or just use it as a reference. A further reason was this wonderful conversation I had with Vanessa Sochat (still makes me super happy to read!). And finally, I wanted to get better at writing!
As of right now, I’m painfully slow at writing, and to be honest, I don’t like at all that much. Especially in the scientific context, I’m regularly procrastinating instead of just getting started with a manuscript. However, that is about to change! Well, at least I hope so, as I want to gain more writing practice when working on this blog 😄
Alright, so for writing a blog, you actually need to set-up a blog somewhere. My requirements were simple: I wanted to host it on GitHub pages, have the actual posts written in Markdown, and wanted as little setup/overhead as possible.
My first try was setting up Jekyll on GithHub pages. After deciding on the beautiful Chalk theme, I started following the documentation on how to get things up and running.
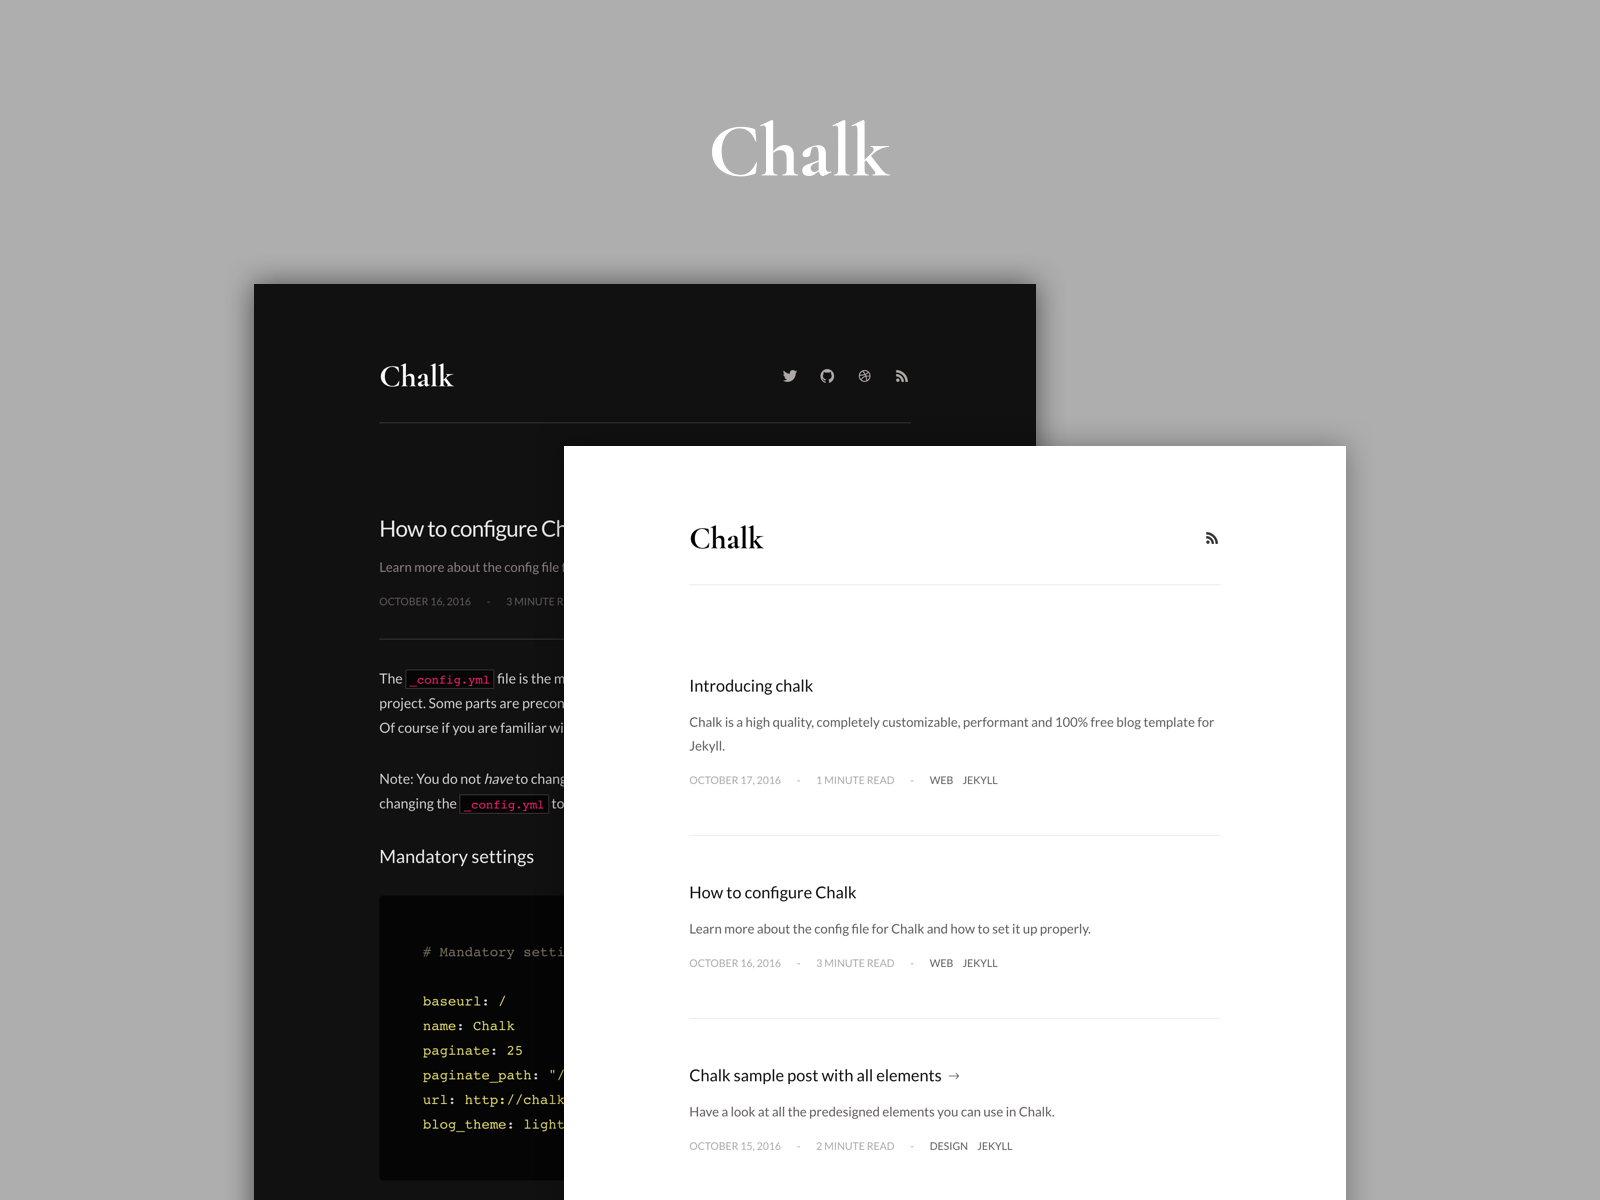 Screenshot of the Chalk Jekyll theme by Nielsen Ramon
The documentation is well written, however I was a little intimidated by its length. Install the software, prepare the git repo, understand local site testing, get to know how to add new posts/sites, read through the Chalk documentation to learn about customization. It all felt like a greater commitment than I initially intended. So after forking Chalk, I ended up not working on it for 3+ months.
Fast forward to a couple of weeks ago, the whole blog idea came up once again. Thinking about whether to continue work on the Jekyll based blog, I came to the conclusion that writing a static site generator myself shouldn’t be all that hard. Conceptually, I thought that I would need a template html file, and a directory for my markdown posts. I also wanted to have a projects and an about page. Here, I thought writing these in html would be preferable, as that would give me more options on the individual styling than with parsed Markdown. Regarding the design, I wanted to closely stick to the wonderful blog by Rasmus Andersson. I especially love his Inter typeface, which I plan to use on more upcoming projects.
 The basic file structure of the static site generator
The image above shows the actual file structure. The overarching index.html, containing the header and footer, as well as the content div’s for the about and projects page are stored in the template folder. As mentioned earlier, the posts directory contains the Markdown files. And that’s basically it! Sure, there is a top level assets folder where the .css and other static resources live, but all in all there is not much magic to the general setup.
Let’s dive into the code. I write most of my projects in JavaScript (JS) / Node.js (especially everything web related), and also used Node.js for this project. To be honest, I am not religious about coding languages, and highly believe that most of the things I do could be done in Python/Go/YourFavoriteProgrammingLanguage/Rust even faster, more performant or generally better (you could rant about this if there was a comment section). However, working in the web area requires you to know JavaScript at least to some degree. And then again, I’m a lazy person that knows his way around JS pretty well. So in essence, that’s why I eventually end up writing most of my stuff in JS.
For a start, we’ll be looking into the index.js file that hosts the main logic. In order to be able to read our markdown posts, and the contents of our template folder, we’ll be requiring the native fs module, as well as some methods from path module.
To show an estimated reading time at the beginning of the article, the reading-time package is used. At the beginning of the markdown posts, meta-data such as the posts title, a short preview of the article for the main page, as well as some keywords are stored in YAML format. We can read this meta-data using the yaml-front-matter package.
const fs = require('fs')
const { extname, basename } = require('path')
const { promisify } = require('util')
const readingTime = require('reading-time')
const yamlFront = require('yaml-front-matter')
const helpers = require('./helpers')

const readdir = promisify(fs.readdir)
const readFile = promisify(fs.readFile)
const stats = promisify(fs.stat)
As you may have already guessed from the use of the promisify method (exported by the native util package), I’m a huge fan of promises, and even more so of the async/await sugar. In order to use the async/await keyword for asynchronously reading files etc., we’ll wrap the main logic in a self invoking async function:
;
(async () => {
  // the main logic goes here, so we can use the await keyword
})()
Ok so first off, we start by reading the index.html template file, containing our page header and footer.
The formatter is created so that we can show a short date string in the post preview of the landing page (e.g. Feb 2020).
We proceed to get a list of all files in the posts directory, and filter the list by files with the extension .md (→ markdown).
;
(async () => {
  const template = await readFile('./src/template/index.html', 'utf8')
  const formatter = new Intl.DateTimeFormat('en', {
    month: 'short'
  })
  // read the entire posts directory and filter for markdown files
  let posts = await readdir('./src/posts')
  posts = posts.filter(post => extname(post) === '.md')
We then proceed to loop through all the posts that were found. For each post,
we create an object with properties for all the meta-info that we parsed from the YAML front-matter.
In addition, we add properties such as the estimated reading time, as well as year, month and date of creation for later use.
Eventually, we update the array that contained a path string of our current post with the newly created object.
for (let i = 0; i < posts.length; i++) {
  // read file content, parse yaml front-matter and markdown content
  // and store info in posts array
  const string = await readFile(`./src/posts/${posts[i]}`, 'utf8')
  const {
    birthtime
  } = await stats(`./src/posts/${posts[i]}`)
  const parsed = yamlFront.loadFront(string)
  parsed.date = new Date(birthtime)
  parsed.month = formatter.format(parsed.date)
  parsed.year = parsed.date.getFullYear()
  parsed.readingTime = readingTime(parsed.__content).text
  parsed.rendered = helpers.renderAndInsertDate(parsed)
  parsed.file = basename(posts[i], '.md')
  posts[i] = parsed
}
From then on, it’s a piece of cake. Given our template html, we start by
creating our landing page. The landing page will have a preview of the latest 15 posts and it’s main contents. The post previews are specified in the YAML front-matter of each post.
// create the landing page (index.html)
// get a string of the first 15 posts and create previews
const previewString = posts.slice(0, 14).map(helpers.postPreview).join('\n')
await helpers.prepareSite('index.html', template, previewString)

// create about page
const aboutString = await readFile('./src/template/about.html', 'utf8')
await helpers.prepareSite('about/index.html', template, aboutString)

// create projects page
const projectsString = await readFile('./src/template/projects.html', 'utf8')
await helpers.prepareSite('projects/index.html', template, projectsString)

// create legal disclosure page
const legalString = await readFile('./src/template/impressum.html', 'utf8')
await helpers.prepareSite('impressum/index.html', template, legalString)

// create posts directory
for (var i = 0; i < posts.length; i++) {
  await helpers.prepareSite(`posts/${posts[i].file}.html`,
    template, posts[i].rendered)
}
The last thing to cover is the helpers module. It exports three methods: postPreview, renderAndInsertDate, and prepareSite. The postPreview method simply returns an html string, which contains the date of creation, the hyperlink to the actual post and the posts preview which will be displayed on the landing page. The renderAndInsertDate is used to render the markdown content of a post (using markdown-it), and to add a small info snippet again containing the posts date of creation, and the estimated reading time.
At last, the prepareSite methods simply splits the index.html template file at the <!--* content goes here *--> comment, and injects the content.
module.exports = {
  postPreview(post) {
    return `<a href="${post.url || 'posts/' + post.file + '.html'}" class="post-preview">
        <h3 class="post-preview-header">${post.title}<h3 class="post-preview-link">↪</h3></h3>
        <div class="post-preview-body">
          <p>
          ${post.preview}
          <info datetime="">
            ${post.month} ${post.year} ${post.readingTime ? '— ' + post.readingTime : ''}
          </info>
          </p>
        </div>
      </a>`
  },
  renderAndInsertDate(post) {
    const html = md.render(post.__content)
    // add date, and estimated reading time
    const snippet = `<info datetime="${post.date.toISOString()}">
      ${post.date.toLocaleString('en-EN', {
        year: 'numeric',
        month: 'long',
        day: 'numeric'
      })} ${post.readingTime ? '— ' + post.readingTime : ''}
    </info>`
     return html.split('</h1>')[0] + '</h1>' + snippet + html.split('</h1>')[1]
  },
  async prepareSite(name, template, content) {
    const first = template.split('<!--*')[0]
    const second = template.split('*-->')[1]
    await writeFile(name, `${first}\n${content}\n${second}`, 'utf8')
  }
}